Cheap (OR FREE) gear substitutes for bikepacking and touring—a somewhat comprehensive guide
/
You can spend a fortune on gear for bikepacking and cycle touring—and most of it works superbly. But if you have a bit of time, can think laterally, are happy to ‘rough it,’ or carry a few extra grams, there are many cheaper alternatives. Getting out on your bike doesn’t have to bankrupt you. Here’s a list of cheap or free bikepacking gear replacements, with their ‘proper’ equivalents, plus how much money you could save.
To be clear, the aim of this post is not to stop you buying good gear, if you want to. The right equipment can make a trip a much more enjoyable. The aim is to counter the notion that you need ‘all the gear’ before you can get out there and explore. You can improvise. You can make do. Often, it’s very satisfying. And you’ll save dough.
If you are interested in my favorite purpose made gear, check out this post.
Beer can stove

Photo by Basten93. Creative Commons license
Can of Melbourne Bitter: $4.19 at Dan Murphys
instead of…
Trangia spirit burner: $30 at Commuter Cycles (save $25.81)
MSR Whisperlite International Multifuel Stove at Wild Earth: $184.50 (save $180.31)
This one is pretty well known, but it’s so good that it’s worth starting off with it. Can you really make a lightweight, rugged and effective camping stove for the price of a beer? You bet. It ticks all the boxes for home made gear: light, cheap, easy to make, rugged, effective. It’s also an excuse to drink more beer!
It involves making a burner out of a beer can (or cat food can, tuna can, etc) which runs on denatured alcohol (methylated spirits in Australia). A pot stand and windshield are optional, depending on the design. And there are many designs out there. This post gives the details on five good ones.
The only downside to a beer can stove is that methylated spirits can be harder to source in very remote parts of the world. That’s where a multi-fuel stove can be really handy. The most famous multi-fuel stove is the venerable MSR Whisperlite, which can run on unleaded, diesel or kerosene. You can find these fuels pretty much anywhere, and they’re dirt cheap. The MSR Whisperlite will also have more oomph than a typical beer can stove, which is good if you need to boil or cook larger quantities.
Enamel mug
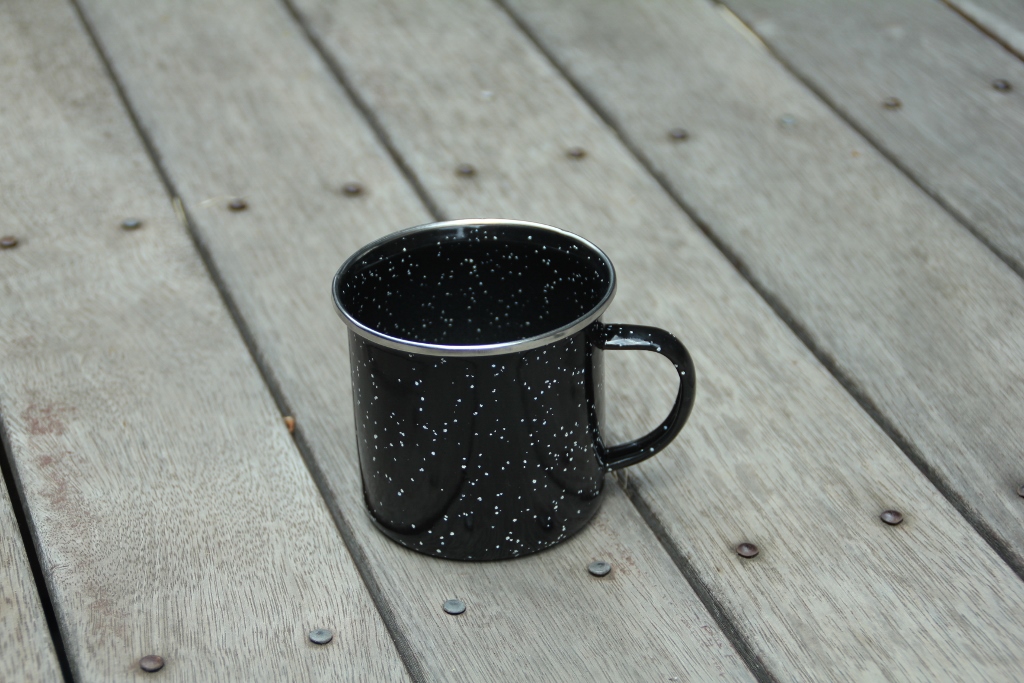
Enamel mug at Kmart: $3
instead of…
MSR Titanium Titan Cup: $89.50 at Wild Earth (save $86.50)
OK, titanium will shave those few extra grams off your pack weight, but holy crap it's expensive. If you compare the two products above, you pay around $1.70 for every gram saved by the titanium mug. And if that’s how you want to spend your money, go for it. I’m not one to judge. But an enamel mug goes for about $5 at your local hardware or camping store, or Kmart. They're still pretty light, durable, and you won't be heartbroken when you leave it out to dry at some campsite and forget to take it with you.
A spoon from the cutlery drawer

Spoon from cutlery drawer: free from the cutlery drawer
instead of…
Primus Trailspork Ultralight Titanium: $27.50 at Wild Earth
Same as the mug example above. A spoon is usually the only bit of cutlery I take with me on trips. The handle end works well as a butter knife, or in an emergency, a tyre lever. Be careful not to damage your rims if you use it as a tyre lever. Plastic tyre levers are much better.
Bottle of iodine

Betadine Antiseptic Topical Solution: $6.99 at Chemist Warehouse
instead of…
Katadyn Water Purifier Tablets at Wild Earth: $37.50 (save $30.51)
Katadyn Hiker Pro Water Microfilter Purifier at Wild Earth: $159.50 (save $152.51)
About ten bucks at the supermarket or chemist, iodine solution is an effective antiseptic for cuts and scrapes. Also, add five drops per litre to sterilise your water. Shake the bottle and wait for half an hour before drinking. Yes, it really works, though of course it doesn't filter out debris. It's also very small and light.

This is a reader supported publication. If you found this information helpful, you can support this website by becoming a patron and making a small monthly donation. You’ll get a name credit on the site (see bottom of page), as well as other rewards. You’ll also be supporting adventure cycling in Victoria, and helping more people get out on their bikes.
Foam sleeping mat

Wanderer EVA Sleep Mat Single: $9.59 at BCF
instead of…
Sea To Summit Ultralight Sleeping Mat: $124.50 at Wild Earth (save $114.91)
Thermarest NeoAir Xlite Max SV Ultralight Hiking Mattress: $419.50 at Wild Earth (save $409.91)
It's definitely not as comfortable as a good inflatable mat, but it's cheap, will insulate you from the ground, is lightning quick to set up and pack up, and will never get punctured. The only problem is that its bulky, so you might have to strap it to the outside of your luggage.
Cheap tarp

6’ X 8’ Tarp: $8 at Kmart
instead of…
DD Tarp M: $69.50 at Wild Earth (save $61.50)
Sea To Summit Escapist Tarp Shelter M: $224.50 at Wild Earth (save $216.50)
Yes, you are more likely to get damp, cold and bothered by insects, but a tarp is a very cheap and light way to shelter yourself in the outdoors. Plus, the hardship only adds to the sense of adventure, right? I once met a guy who was hiking the length of New Zealand with no other shelter than a cheap tarp. If he can do it, so can you.
It takes a bit more skill and inventiveness to set up a tarp well. You will need some ropes/guys and pegs, and you’ll want to combine the tarp with a groundsheet or bivy bag. There are many ways to set up a tarp. Plenty of good ideas can be found on youtube.
This post discusses some pros and cons of tarp camping.
Tyvek ground sheet

Tyvek material: varies
instead of…
Sea to Summit Escapist Groundsheet: $69.50 at Wild Earth (this is also made of Tyvek)
If you’re tarp camping—or as an addition to your tent—you may well want a Tyvek ground sheet. The material is light, durable, waterproof and can be cut to the size/shape required. It’s typically used by builders during construction, so it’s usually sold in large quantities from building suppliers. It can therefore be a bit hard to get your hands on. You may have to order from overseas or simply ask a builder if they’ll sell you a bit. But it will keep you off the ground when tarp camping, or improving the weatherproofness and decrease the condensation in your tent.
Dry bags

Sea To Summit Big River Waterproof Dry Bag 13L: $44.95 at Wild Earth
instead of…
Ortlieb Handlebar Pack L: $209 at Velo Cycles (save $164.05)
Ortlieb Seat Pack L: $209 at Velo Cycles (save $164.05)
Dry bags can be strapped onto the handlebars or under the seat using gear straps, where they will work much like bikepacking specific bags. They may be a little more clumsy than bikepacking-specific bags (though not necessarily), but they’ll carry your stuff all the same. Note: make sure you use heavy duty, abrasion resistant dry bags. Some of the best gear straps for this kind of use are Voile Straps, which I must say are excellent. However, you can also use…
Old toe straps or inner tubes

Old inner tube or toe strap: free
instead of…
Voile Straps: $12-18 each at Commuter Cycles
A lot of cyclists have old inner tubes or toe straps lying around, which can be pressed into service for bikepacking. If not, your local bike shop will almost certainly have old inner tubes, and toe straps can be purchased quite cheaply. Use them to tie down pretty much anything: bags, tent poles, sandals, rain jackets, inflatable elephants.
If you’re strapping a bag to your handlebars, you may want a bumper on your head tube. This will prevent unnecessary abrasion, and stop the bag from squashing your brake and gear cabling. The one pictured here was made from a foam roller, and is held on by an inner tube.
Toe straps are also useful for stopping your bike from rolling and falling over when parked, or on a train. Use one to clamp the brake lever down, or tie it from the down tube around the front wheel. This will also make it harder for nefarious people to make off with your bike.
Another great way to carry a dry bag is the…
DIY handlebar harness
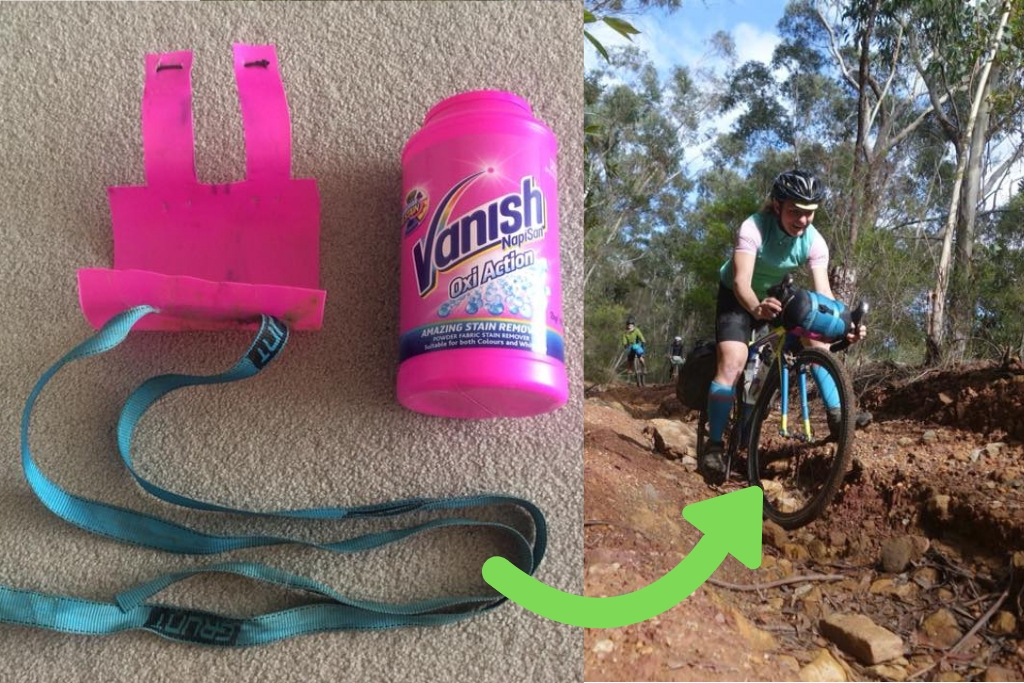
Napisan Gold Oxi Action Stain Remover 1kg: $10.99 at Woolworths + Grunt 25mm x 2m Pull Tie Down Lashing Strap: $5.50 at Bunnings
(Total: $21.99)
instead of…
Salsa EXP Anything Cradle with straps: $229.99 at Pushys (save $208)
This gem came to me from Lizanne Fox via facebook. Lizanne made this handlebar harness out of a Napisan bottle and a couple of tie-down straps from the hardware store. She’s put a lot of miles into it over a couple of years, and it has apparently lasted pretty well. Nice work!
In truth, there are so many things you can make yourself, such as bags, or an anything cage cut from a water canister. This post will become too unwieldly if I try to include them all. Let this example be an inspiration for your own wild and whacky inventions!
Trusty old backpack

It’s always better to have things off your back if possible. Nevertheless, a backpack can do the job for a quick overnighter. If you want to dip your toe into bikepacking without splashing out on bags, go for it. You’ll still have fun, and you’ll quickly realise why people put stuff on their bikes most of the time.
Maps.Me phone app and printouts from the web

Maps.Me app: free
A4 black & white printout: 8c each at Officeworks
instead of…
Garmin eTrex 10 GPS worldwide: $156.50 at Wild Earth
Proper maps: varies, usually between $10—$20
Disclaimer: in remote areas, it is very important to be able to navigate accurately and reliably, and you shouldn’t skimp on this.
But with that caveat out of the way, you can get away with a lot by using printouts and/or a mobile app. The particular mobile app that I use most is Maps.Me. It’s free, and it allows you to download maps that you can then view offline. You can also load routes onto it. This post explains how. Google maps also allows you to download maps for offline viewing. To preserve batteries, turn flight mode on, close apps you are not using, and only use location tracking when necessary.
It’s always good to have a non-technological backup in case your device stops working, and there is no substitute for a good map. However you can simply print sections from google maps, or from other sources. Other good places to find free maps are your state parks service website (Parks Vic, etc), regional tourism association websites, or tourist information centres in the area your riding through. And of course, the ride guides on this website!
Ammunition pouch food bag

Military Molle Ammo Pouch: about $10AUD at Aliexpress
instead of
Apidura Backcountry Food Pouch Plus 0.8L: $75 at Treadly Bike Shop
I hesitated before including this one because I’m pitting a small local business against a giant, faceless corporation. I try to support local shops where possible. They are, in some ways, the life blood of our community and we should get behind them. However, if I’m committed to creating a comprehensive list of cheap bikepacking gear, I must do it. And whatever way you cut it, $75 is a lot to pay for a little nylon sack. Ultimately I’m only providing information. It is up to you, the consumer, how you want to spend your money.
Having said all of that, an ammo bag can make a great food pouch, apparently. At least that’s according to some more folks facebook. I haven’t actually tried this one myself. I generally don’t ride at such a frenetic pace that I can’t stop and pull a snack out of my frame bag or something.
Have I missed anything? Have you tried any of these things? Do they work? Leave a comment.
Get notified about new posts by signing up to the mailing list in the sidebar.
OTHER POSTS LIKE THIS ONE
Some links on this page are affiliate links.
